Summing expenses based on filename: I figured out a few naming systems for my receipts, and made a handy python script to quickly give me the sum of receipts within a folder.
Here’s another in my series of tutorials of using the free version of Isadora (without additional downloads) to do some quick surtitle / dialogue projection! Imagine you’re in a workshop, and you just want to quickly put together some surtitling tests. You have the script. You have a free installation (without license) of Isadora on your laptop (or you can go download one right now). This should get you up and running to make some surtitling happen!
Script preparation
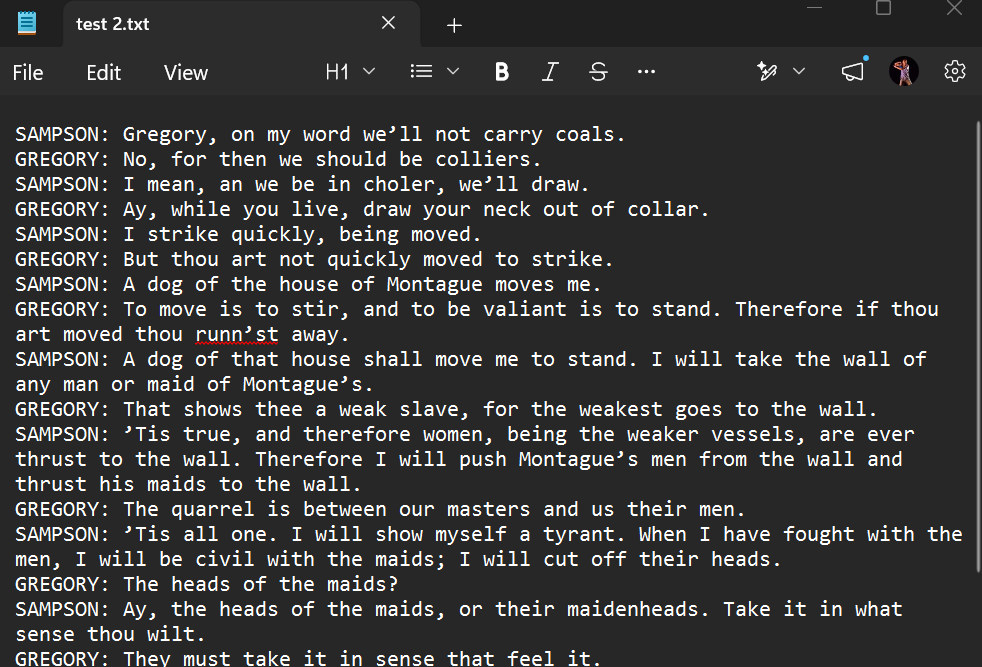
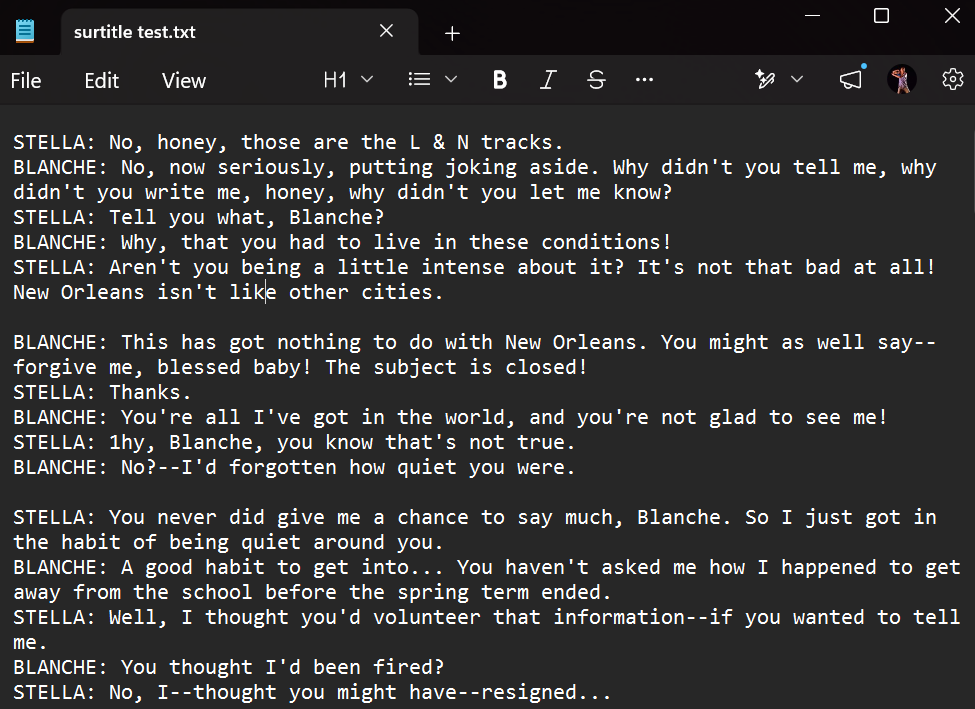
Once again, this involves preparing your script in a standardized format in a text file (.txt). In our example, it looks something like this:
[character name]: [the line]
It is important to make sure to eliminate line breaks to make sure the dialogue by the same character is on the same line. A line without a character name heading will not show up.
(it can be hard to tell what is just a line break because of the window size of the text editor, and what is a new line break/new sentence. You can try adjusting the window size to see if the line break moves. Or, you’ll find out soon enough once you get the text up on projection what line has been cut off)
If in your script, it’s something else instead of the colon (“:”) following the character name in each line, that’s all good too – I’ll tell you how to specify that later in this tutorial. But for now let’s move ahead with my example.
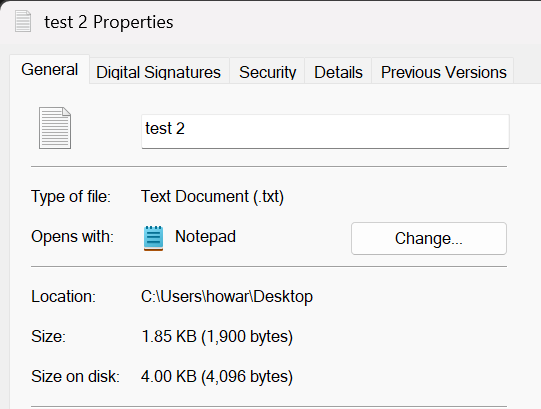
You’ll need to copy the path name of this text file soon. The way I find this that’s the easiest to me is to right click on the file and select “properties” (oh ya, I’m using a Windows computer, but I’m sure something similar applies to other OS):
You’ll need the location & file name soon.
Isadora setup
Launch Isadora!
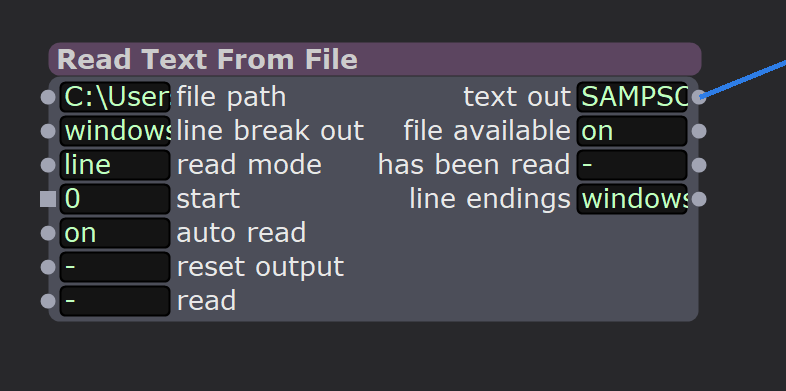
Search for Read Text From File on the left hand search bar and drag that into your editor window.
in “file path”, you’ll want to put in the file path you found earlier. In my example it’s C:\Users\howar\Desktop\test 2.txt.
in “read mode” right click to select “line” as we are reading line by line
“auto read” right click to select “on”
now if you click on the space next the “start” and drag up and down you should see some text scrolling in the “text out” output
Now back to the left hand menu and search for Javascript to place to the right of Read Text From File.
In the Javascript actor:
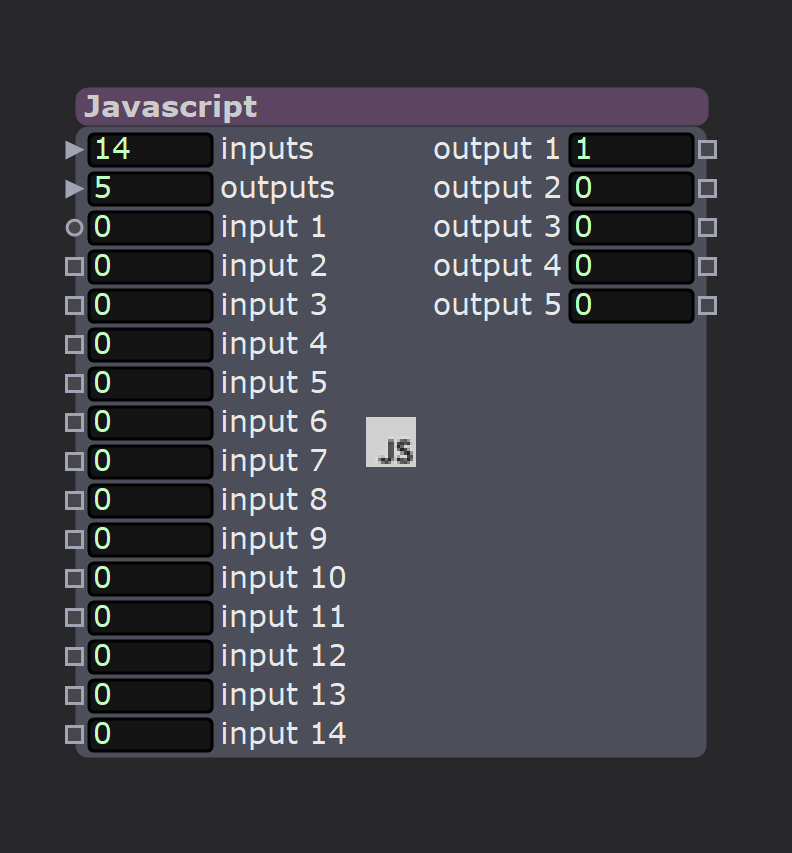
change inputs to 14
chagne outputs to 5
you should see the number of inputs and outputs updated
Double click the Javascript actor and a code editor window should pop out. Replace all content with this:
// iz_input 1 "input string"
// iz_input 2 "name 1"
// iz_input 3 "colour 1"
// iz_input 4 "horz pos 1"
// iz_input 5 "vert pos 1"
// iz_input 6 "name 2"
// iz_input 7 "colour 2"
// iz_input 8 "horz pos 2"
// iz_input 9 "vert pos 2"
// iz_input 10 "name 3"
// iz_input 11 "colour 3"
// iz_input 12 "horz pos 3"
// iz_input 13 "vert pos 3"
// iz_input 14 "splitter"
// iz_output 1 "character"
// iz_output 2 "line"
// iz_output 3 "horz pos"
// iz_output 4 "vert pos"
// iz_output 5 "colour"


function main()
{
	var inputText = arguments[0].toString();

	var char1 = [arguments[1].toString(), arguments[2], arguments[3], arguments[4]];
	var char2 = [arguments[5].toString(), arguments[6], arguments[7], arguments[8]];
	var char3 = [arguments[9].toString(), arguments[10], arguments[11], arguments[12]];

	// if splitter is specified - otherwise it's just ":"
	if (arguments[13].toString() == ''){
		var splitter = ":";
	} else {
		var splitter = arguments[13].toString();
	}

	// using ... rest operator and .join() later so it leaves the other occurences of this splitter in the rest of the line intact
	var [character, ...line] = inputText.split(splitter);	let pos = []
		switch (character) {
      case char1[0]:
    	  var textColour= char1[1];
    		pos.push(char1[2], char1[3]) ;
    		break;
  		case char2[0]:
    		var textColour= char2[1];
    		pos.push(char2[2], char2[3]) ;
    		break;
			case char3[0]:
    		var textColour= char1[1];
    		pos.push(char3[2], char3[3]) ;
    		break;
  		default:
   		 	var textColour= '000000'
			}

	return [character, line.join(splitter), pos[0], pos[1], textColour]
}
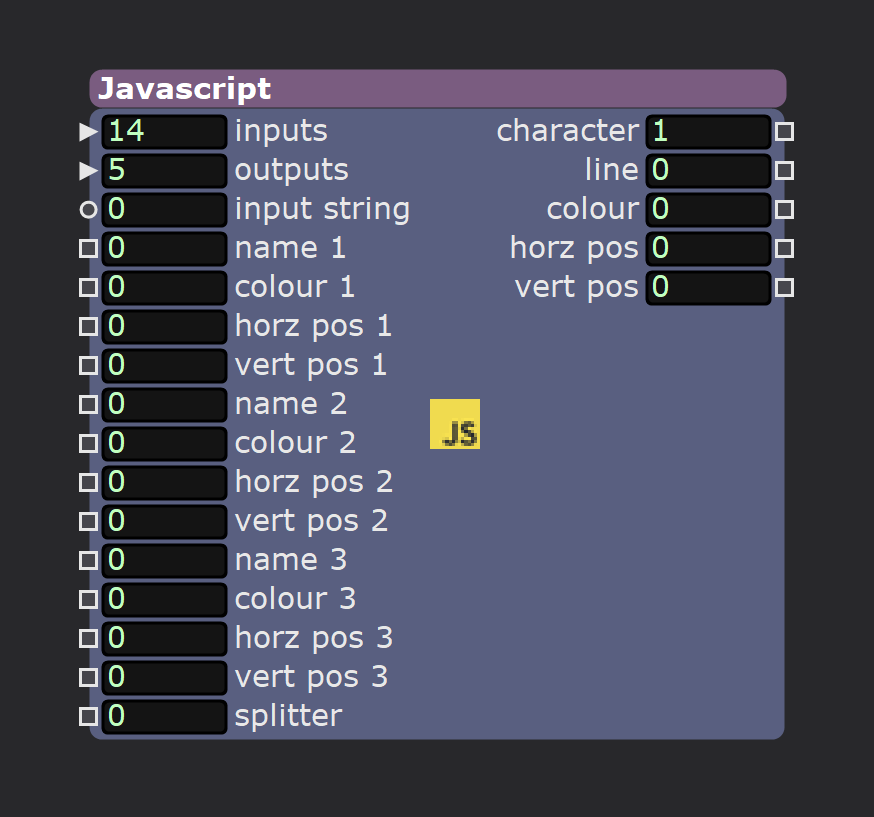
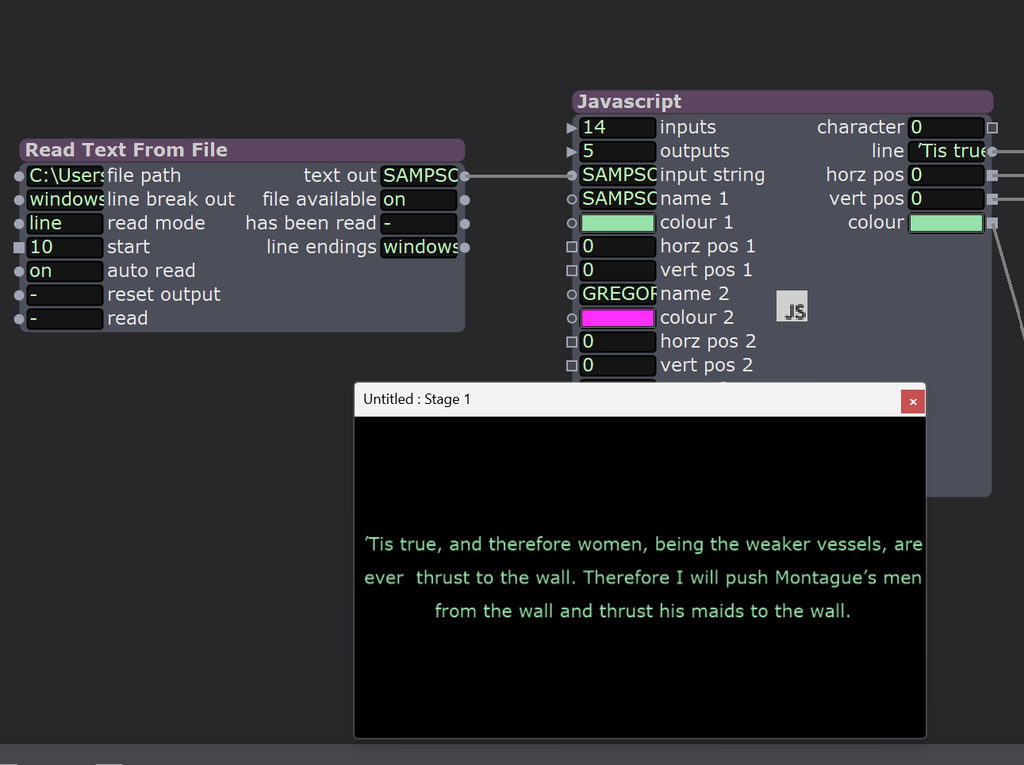
Hit OK. Your Javascript actor should now look like this, with the input/output labels updated:
(except that on the right side of this actor, on your screen the “colour” output should be at the bottom rather than in the middle. I updated the code to be that way so it’s easier to connect later, but the next few screenshots you’ll those are in the wrong order. Don’t worry about it yet.)
The slightly tedious thing about this Javascript actor is that these input/output are by default of Float types (so, numbers), which is great for times when you are using number but not great for when you want to see anything else. We have to force it the change by connecting it to an input/output of the type that we want.
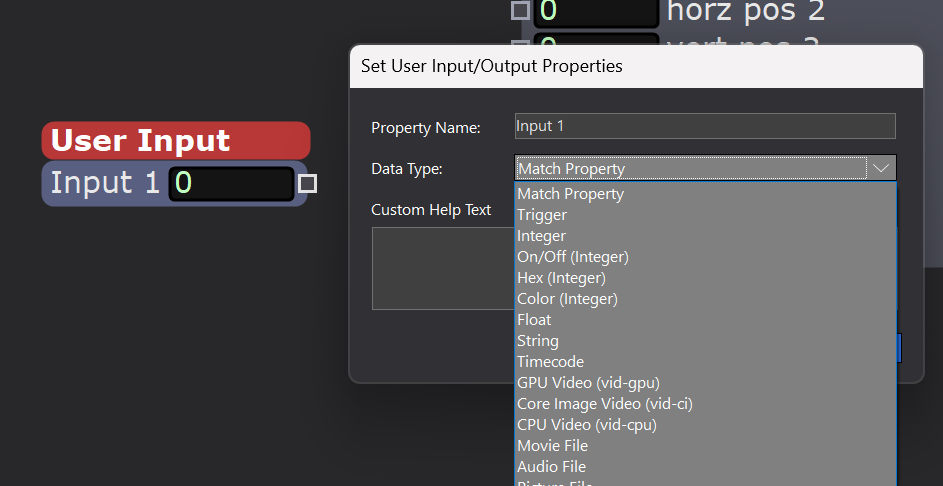
In the left hand side bar, search for an User Input to bring to the left of this Javascript actor. Double click it to select the Data Type “String”
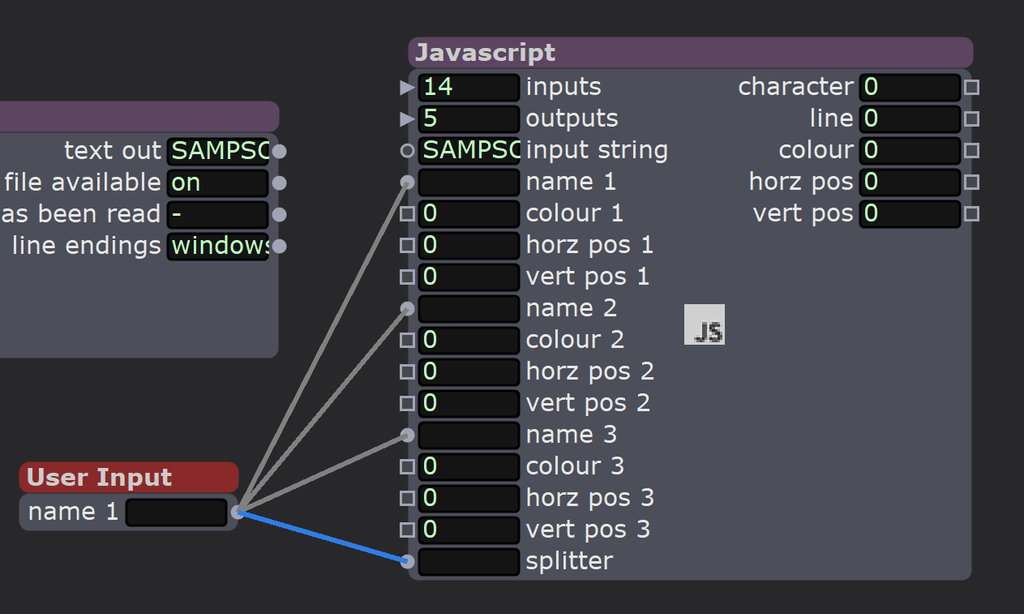
Now, connect the User Input to “name 1”, “name 2”, “name 3”, “splitter” of the Javascript Actor. Click the white dot to the right of User Input and connect it to the desired dots.
You made those inputs of String type! You can click on the lines to delete each of them. Now you can click directly on the input of those Javascript actors and write words.
Now go back to User Input:
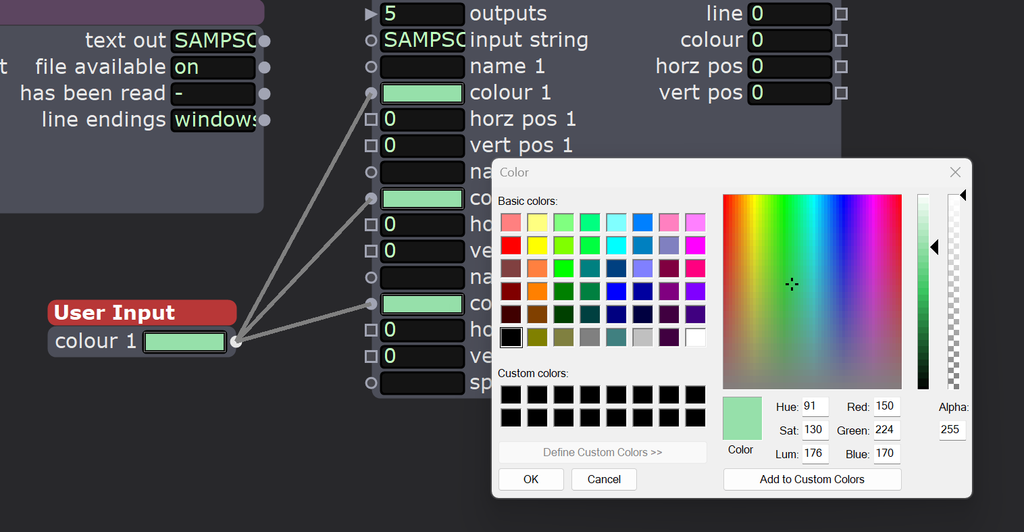
double click and change the type to Color (Integer).
Connect it to “colour 1” “colour 2” “colour 3”.
click on the rectangular field to open up the color picker.
Make sure the Alpha slide all the way to the right is all the way so it’s solid rather than transparent! As well as the brightness slider next to it.
Close and delete the connecting lines.
We’ve now changed the input types to what we want! You can delete User Input now – we don’t need it anymore.
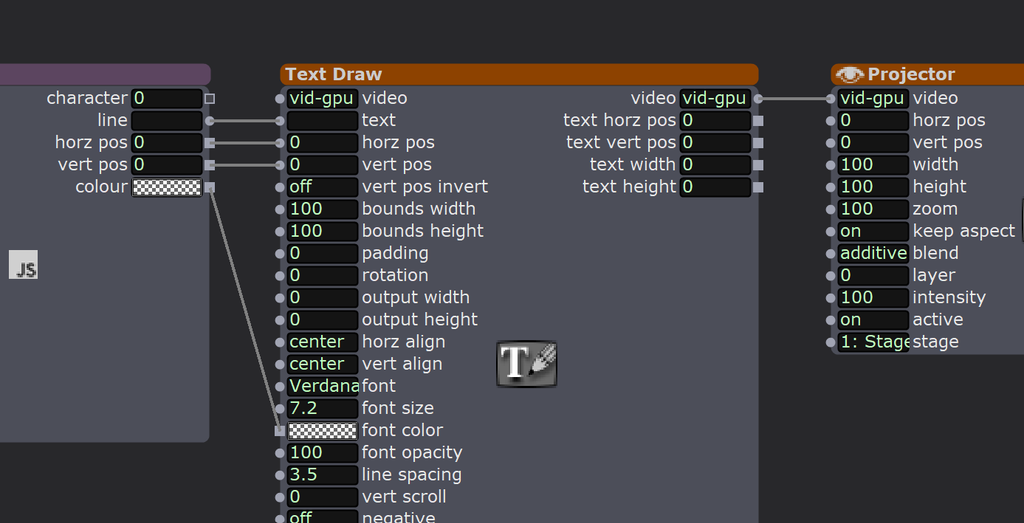
Now for the outputs, let’s get a Text Draw actor and put it next to Javascript, and connect them as such:
“line” to “text”
“horz pos” to “horz pos”
“vert pos” to “vert pos”
“colour” to “font color”
And finally, put a Projector next to Text Draw, and connect “video” to “video”.
You’re all set up!
Now, let’s go back to thte Javascript actor. Let’s put SAMPSON in “name 1”, and GREGORY in “name 2, and pick a different colour for them.
Hit Ctrl+G (or Command + G on Mac) to open the stage preview. Then if you go back to Read Text From File and click and hold the “start” input number and drag up and down, it’ll scroll through the line and you should see the lines show up in their character corresponding colour!
You did it!!
Then, you may want to change the “horz pos” (horizontal position) and “vert pos” (vertical position) under the “name” so that different character’s lines show up at different places on the screen!
Word Wrap
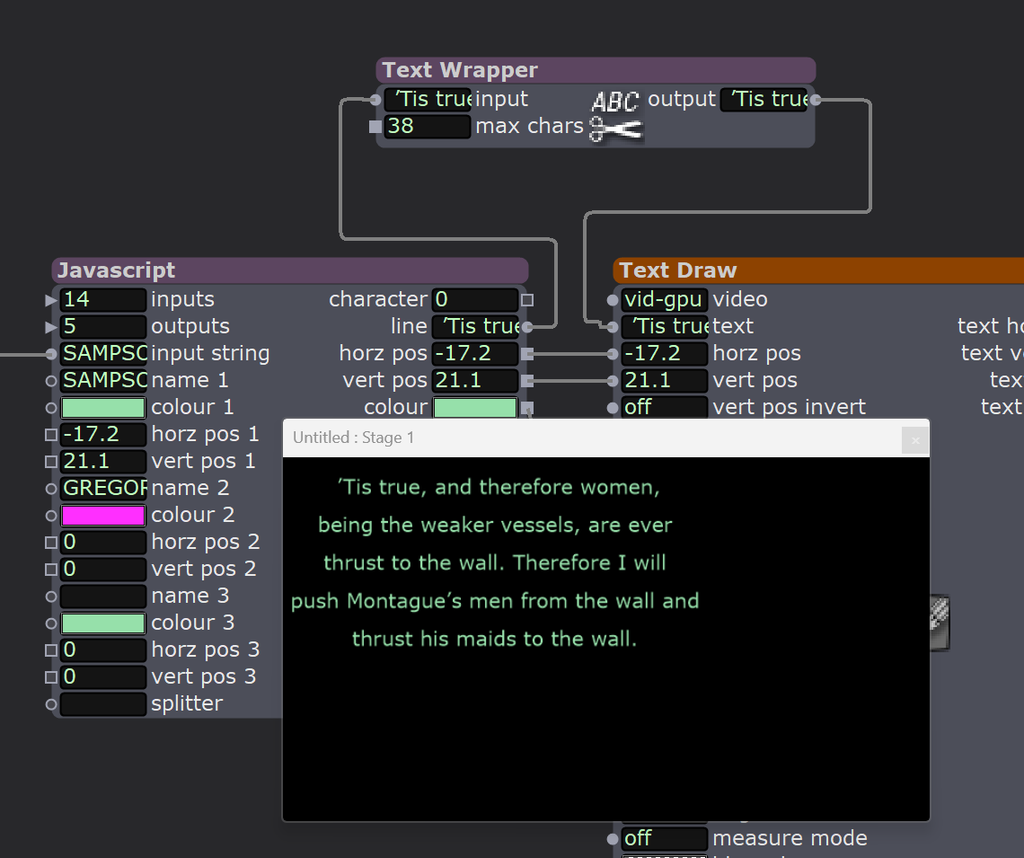
If you’ve got big chunky lines, you may want to consider wrapping the line. You can do by adding the Text Wrapper actor, and insert it between the Javascript actor “line” output and Text Draw “text input”.
Here you can see the “max chars” is 38, so it breaks to a new line after 38 characters. You’ll notice here that under “horz pos 1” and “vert pos 1” I’ve moved Sampson’s lines to be in the upper left corner.
Keyboard Watcher
To make operating easier, you also may want to add Keyboard Watchers & Counters to help you operate / navigate through surtitles.
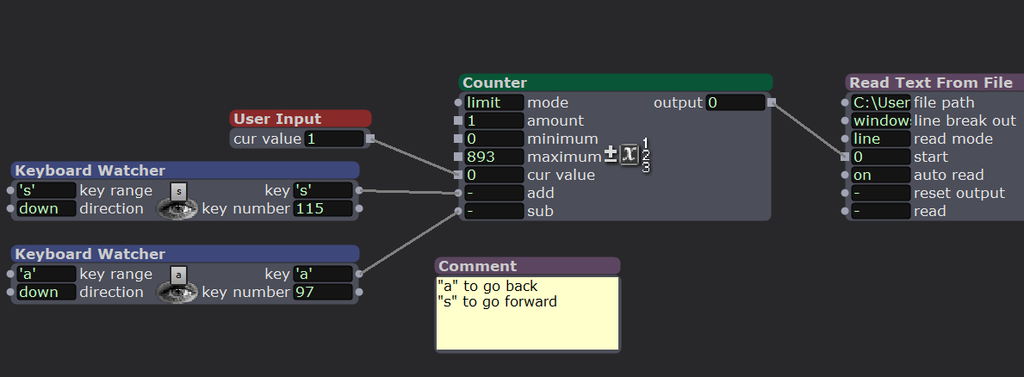
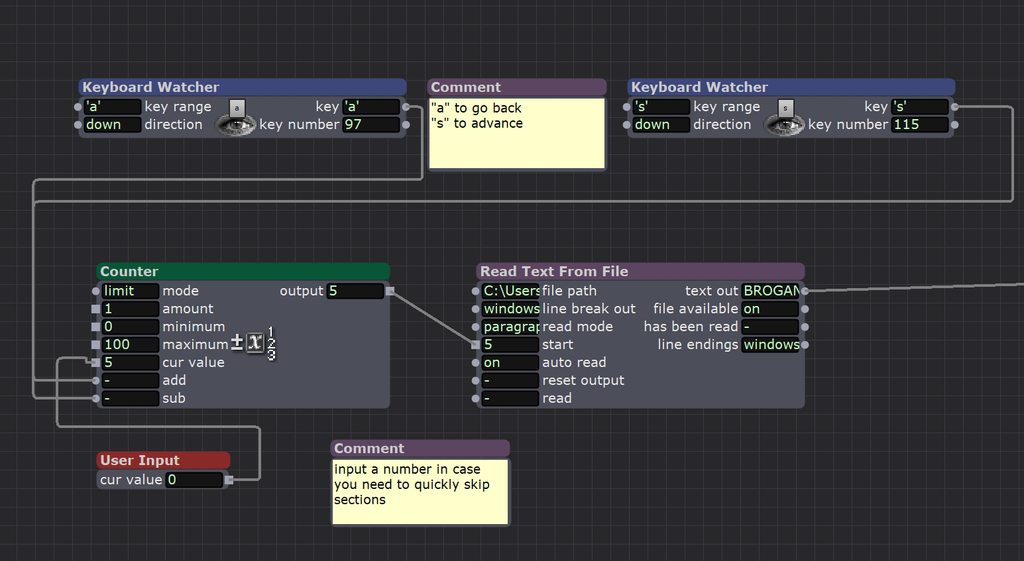
Let me explain what’s happening here… We’ll look from the right side of the screenshot and move left.
We want to control the number in the “start” input of Read Text From File as that determine which number line in the script we are displaying.
Let’s add a Counter actor and connect the output to start.
you should also increase the “maximum” amount to more than the number of lines you have in the text file so you don’t run into issue.
if “limit” is selected under the “mode” input, that means once you hit the maximum number it’ll just stay there; whereas “wrap” mode will send you back down to 0 / beginning if you add to the number after it hits maximum value.
You can click the “input” for “cur value” (current value) and quickly jump to the line number you want. I just personally like to connect an User Input to it so it looks easier to understand but totally optional (some might consider this unneccessary!)/
Add two Keyboard Watcher actors, one to the “add” input and the other to the “sub” (subtract) input. I chose letter “A” and “S” as they’re right next to each other but it can really be anything.
to select which key in “key range”, you really just have to click and hold in the black rectangle input area and drag.
Alternatively, click the dot next to that input and you’ll get a wheel that you can drag to scrub through letters.
Now you can use those keys to move forward and backward in surtitles!
Specify Splitter
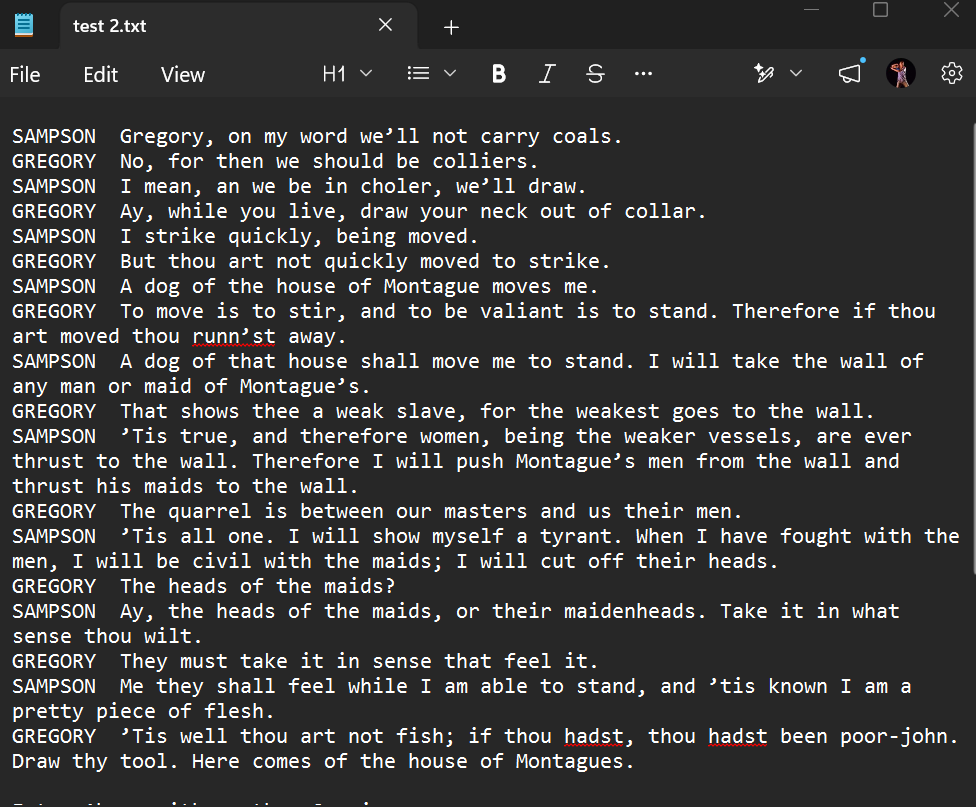
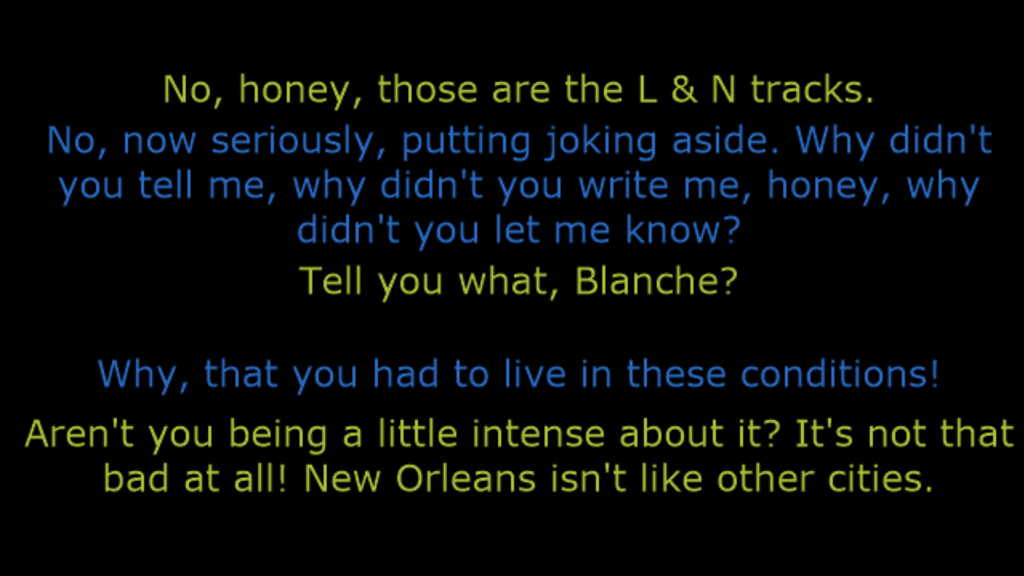
Let’s say your script doesn’t have a colon after each character the name and you don’t want to go line by line to change that (that defeats the point of this whole quick Isadora demo!), I’ve written something in the code where you can specify the “splitter” character(s). In the below example, when I pulled this text from the internet, the format they’ve got is double space after the character name:
So what we’ll do is go to the Javascript actor, go to the “splitter” input (the last one at the bottom), and type in double space (it’ll look like nothing…because it’s just empty spaces. But you know what I mean right?)
And ta-da! That should do it! If you do not specify the character in the “splitter” input, the splitter by default is a colon (“:”).
Hopefully this is easy enough to get you started on playing in Isadora! Perhaps I’ll make a screen recording walkthrough if there’s demands for it (let me know in the comments, lol). Let me know if you have any questions!
See also: if you wanna do some teleprompting, here’s a tutorial for putting five lines at a time on the screen, also with each character having their own font colour.
Sometimes you just want to spin up Isadora on your laptop without subscription (hence without the ability to save project, or even User Actor/Macros), so you can get some scripted lines onto the screen. Here’s an example usage of maximizing the Javascript actor, and minimizing the Isadora Actors required to throw up a teleprompter that take a text file of the script!
To begin, copy and paste the script into a text file (.txt), and breaking the script up into five line chunk (we’ll consider this our “page”), each line following the format of:
[character name]: [dialogue]
Something like this:
Moving into Isadora, here’s the setup:
Two Keyboard Watchers into a counter to toggle to page number / aka chunk number.
A User Input actor where we can type in an integer to quick jump to the section we want to see.
Read Text From File to locate the .txt file which is the prepared script.
“Read mode” shuold be “paragraph”
“auto read” to on.
so that it’ll pick up five lines at a time which was how we divided it up.
the Text Out will connect to a Javascript Actor…..
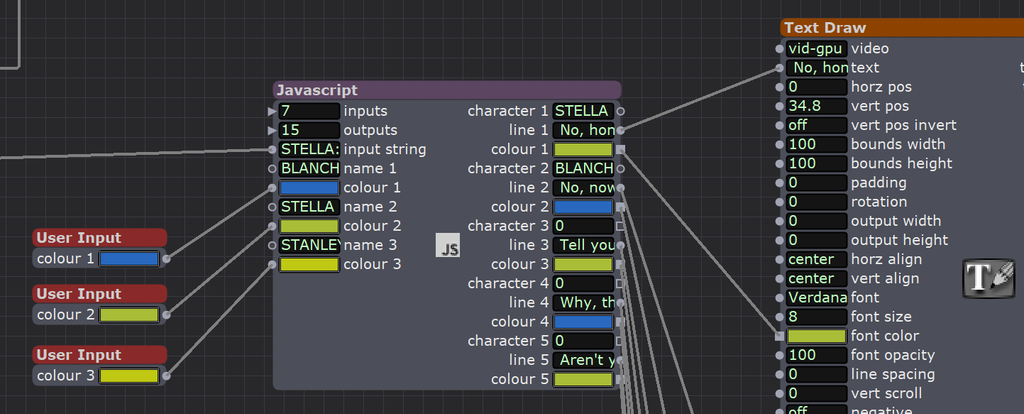
For this example let’s select the number of inputs to 7 and outputs to 15 on the upper left side of this actor, then double click on the Javascript Actor to open up the code editor, and add the following code:
// iz_input 1 "input string"
// iz_input 2 "name 1"
// iz_input 3 "colour 1"
// iz_input 4 "name 2"
// iz_input 5 "colour 2"
// iz_input 6 "name 3"
// iz_input 7 "colour 3"
// iz_output 1 "character 1"
// iz_output 2 "line 1"
// iz_output 3 "colour 1"
// iz_output 4 "character 2"
// iz_output 5 "line 2"
// iz_output 6 "colour 2"
// iz_output 7 "character 3"
// iz_output 8 "line 3"
// iz_output 9 "colour 3"
// iz_output 10 "character 4"
// iz_output 11 "line 4"
// iz_output 12 "colour 4"
// iz_output 13 "character 5"
// iz_output 14 "line 5"
// iz_output 15 "colour 5"


function main()
{
	var inputText = arguments[0].toString();
	var allLines = inputText.split(/\r?\n/, 5)

	var characters= [];
	var lines= [];
	var colours= [];

	var char1 = [arguments[1].toString(), arguments[2]];
	var char2 = [arguments[3].toString(), arguments[4]];
	var char3 = [arguments[5].toString(), arguments[6]];

	for (var eachLine of allLines) {
// using rest operator (...) otherwise .split() would just discard the rset of the line
		var [character, ...line] = eachLine.split(":");
		switch (character) {
  			case char1[0]:
    			var textColour= char1[1];
    			break;
  			case char2[0]:
				var textColour= char2[1];
				break;
			case char3[0]:
				var textColour= char3[1];
				break;
  			default:
   		 	var textColour= '000000'
			}
		characters.push(character), lines.push(line.join('')), colours.push(textColour);
	}

	var finalArray = [];
	for (let i = 0; i < 5; i++) {
 	 finalArray.push(characters[i]);
 	 finalArray.push(lines[i]);
 	 finalArray.push(colours[i]);
 	 ;
	}

	return finalArray
}
For the inputs, the way we tell the Javascript actor what to accept is by connecting something of that type to it.
Add an User Input, double click and change the type String to connect to the three name inputs so that they change to text input. Type in the User Input so they update.
Disconnect the User Input and change it to color and connecte it all to the three color inputs. Change the color (make sure the Alpha at the right hand side is set to max) so the colors update. Then you can delete the User Input and edit directly on the Javascript Actor.
This is us giving the parameter of the character name that we’ll use to parse the script text with. And choosing a font colour we want each character’s lines to be displayed in.
If we want to add more characters, it just involves adding more inputs and adding more cases in the Switch/Case logic in Javascript.
if you want to hard-code the colour input, the Text Draw actor takes a 32 bit integer input, so use this converter: https://color-converter-tool.web.app/
Similarly for the outputs, we’ll have to force the output type into string / color.
Create five Text Draw actors, each connecting to their own Projector output.
Each of the five lines will connect the text input and the font color of a Text Draw. You’ll want to manually adjust the vertical position (“ver pos”) of each Text Draw separately so five lines are spaced out evenly.
For chunkier lines, you may want to only have three lines displayed per page. In that case the in-between lines you can just put any random text/character to take up the space of a line – as long as it’s not an empty line / line break.
And ta-da, it’ll look something like this!
🙂
See also: if you wanna do some line by line surtitling, with the ability to specify the text location and colour based on character, here’s a tutorial.
It was 2011. I was 14 years old. It was my second year in Canada and I had just discovered theatre. One of the first things I did was join The Cultch IGNITE youth panel, and through it I got to take a three-day PodPlay workshop hosted by then-Artistic-Producer of Neworld Theatre, none other than Adrienne Wong. We learned a bit about the project and form, and got a chance to make our own lil PodPlay around the block at Victoria Drive and Venables. I loved it. It blew my mind.
Nearly five years later. In grade 12, as part of my high school drama class’s final project (an unit called “What is Theatre” which I believe Ms. Monte still does till this day), I made a semi-autobiographical audio-play. The listener gets a toonie and a mp3 player to start, and gets to enter the mind of a high school kid; walking through the overpass, opening a locker and discovering its content, and getting a snack of their choice at the vending machine with the toonie. I sent an email to Adrienne with the PodPlay I made, which even though she had already moved to Ottawa and left Neworld at that point, still graciously listened to and gave me encouraging feedback. It meant so much to me as someone who was still deciding whether he really wanted to study theatre after high school. This was also the time when Tiger and I had just started Two Gents of New West , and our next project was making an audio-play commissioned by Massey Theatre ‘s Jessica Schneider for the 65th anniversary of the theatre. We researched the history of the building and got some actors to record it, but also needed someone to help us with hosting a PodPlay-making workshop , and as well as sourcing some MP3 players for the presentation of the piece. Adrienne generously helped with both, while being afar in Ottawa. When it came time to return the MP3 players, I had somehow misplaced one of the micro-usb data cables for the devices. There were more so Neworld was generous in telling me not to worry about it but I continued to look for it….
Five years later, it was 2020. The world shut down but I was lucky to get to take advantage of the various digital opportunities available. After the Massey Theatre project, Tiger had started writing The Rex Project, about a robot who is learning human thoughts and emotions by living through episodes of “simulations” and sending the report to the audience member who gets to vet these reports. (The first draft of this script also got a dramaturgical reading by the late Kathleen Flaherty who offered us feedback for free. ) By 2020 though, I had picked up the script and developed it further to become an immersive, AR experience that took over two weeks where you interact with the project through navigating websites, answering and writing emails to characters, and more. The project was chosen by Impulse Theatre ‘s Peek Fest Digital Residency , and the mentor they had was, you guessed it, Adrienne! I remember remarking how incredible it was that ten years later I got to work with her again on the art form that she first introduced me to. It felt like a full circle moment.
Five years after that, in 2025, I have been feeling untethered and lost and going through a bit of a quarter life crisis. I have been so lucky to be working on back to back projects that fueled and nourished me since theatre school and am now finding myself in the default of underemployment. While working a joe job, I got a phone call from Adrienne, choosing me to be her Emerging Artist for the Siminovitch Prize; her phone call felt like winning the lottery. In fact, every time our paths crossed felt like winning the lottery.
I’m just one person. I’m sure everyone that has worked with Adrienne has a story. When I think of “groundbreaking”, I think of someone whose work can blow open the expectation/understanding of an art form, someone who actively works to advance the form, and someone who has the gift to empower others to innovate alongside her. Adrienne does all of this, while keeping the community, accessibility, and play at its core. She continues to be so generous and truly helps out whenever she can. There is an expanding network of us who have been lifted up by her.
Thank you Adrienne for your recognition – I also share this with the community of resilient makers and artists in Vancouver indie community who are all working through the grind and pumping out good work despite the obstacles. I am inspired daily by my colleagues and friends making it work while juggling a million things to keep afloat, and feel held and fostered by this supportive community.
Thank you to Aimee and the Siminovitch Prize for Theatre for the event this past week. They organized a lunch between the four emerging artists and I feel so lucky to get to meet Kat, Mary-Lee, and Miriam and hear about their incredible journeys and body of work. Huge congrats to Ravi and Miriam for winning the prize & protege! It was a beautiful evening of celebration and community.
Last week, I got to open the Time Capsule I made for myself in 2020 (during the month of my digital residency with Adrienne). One of the objects, to my surprise, was the micro USB cable I had misplaced back in 2015; which I had apparently found a few months later but never remembered to return it to Neworld. So I added it to the capsule, part of the Remember November by Neworld, thinking I’ll finally be able to return it (go to pic #12 To read what I wrote about it when I added it into the capsule). Instead, I brought it with me to Toronto and gave it to Adrienne. I don’t think Neworld nor Adrienne will have any use for it anymore (what device still uses micro USB these days?!), but it did feel symbolic to mark another one of these incredible five year cycles. Marking my calendar for 2030 for something surely amazing to come
As a freelance artist, tax season has really become quite a headache. I’ve gotten into the practice of scanning every receipt onto Google Drive as soon as I get them, and naming the file with something like “May 15 24.10.pdf” or “$33.66 London Drugs.pdf”. But when it comes time to actually add those numbers together, I am overcome with dread just looking at hundreds of files in each folder.
This is a handy little Python script I wrote (instead of actually filing the tax returns, I know I know…) that once you feed the folder path and the file naming system in that folder, it would spit out the total sum of the expenses it finds in the filenames (and also note for you if anything file doesn’t seem to match the system you specified).
#   As a freelancer, I saved many receipts a day onto a cloud folder with a loose naming system
#   consisting of generally dollar amount + dates or some description of the expense.
#   As each folder has a slightly different system, here's a program where I could choose which
#   naming system I'm using in each folder before it spits out the sum of amount.

import re, os, decimal

#because float() is an approximation and gives weird decimal points
from decimal import Decimal

# file path for the folder which this program will iterate through filenames
path = input('paste path here: ')

os.chdir(path)

totalSum = 0
counter = 0

def resetNumber():
#   need to declare global, or will get UnboundLocalError
    global totalSum, counter
    totalSum = 0
    counter = 0

def expenseRun(regexToUse):
#   passing global variables to function
    global totalSum, counter
    resetNumber()
    if regexToUse == 'apple':
        appleExpense(totalSum, counter)
    elif regexToUse == 'banana':
        bananaExpense(totalSum, counter)
    elif regexToUse == 'cow':
        cowExpense(totalSum, counter)
    else:
        print('error! try again!')


def appleExpense(totalSum, counter):
    for filename in os.listdir():
        if apple.search(filename) == None:
            print('error! file name is '+filename)
        else:
            result = apple.search(filename)
            totalSum += Decimal(result.group(1))
            counter += 1
            print('receipt #' + str(counter) + '- ' +str(result.group(1))+' from '+str(result.group(2))+'. Now totaling at '+ str(totalSum) )
    print('\nTOTAL SUM IS: '+str(totalSum))

def bananaExpense(totalSum, counter):
    for filename in os.listdir():
        if banana.search(filename) == None:
            print('error! file name is '+filename)
        else:
            result = banana.search(filename)
            totalSum += Decimal(result.group(2))
            counter += 1
            print('receipt #' + str(counter) + '- ' +str(result.group(2))+' from '+str(result.group(1))+'. Now totaling at '+ str(totalSum) )
    print('\nTOTAL SUM IS: '+str(totalSum))

def cowExpense(totalSum, counter):
    for filename in os.listdir():
        if cow.search(filename) == None:
            print('error! file name is '+filename)
        else:
            result = cow.search(filename)
            totalSum += Decimal(result.group(1))
            counter += 1
            print('receipt #' + str(counter) + '- ' +str(result.group(1))+'. Now totaling at '+ str(totalSum) )
    print('\nTOTAL SUM IS: '+str(totalSum))

#re.compile(r'expression')

# group1 = another number of digits separated by a period (ex. "12.34")
# group2 = anything that comes after the digits and a space, and before ".pdf" file extension
apple = re.compile(r'(\d+\.\d+)\s+(.*)(\.pdf$)')

# group1 = any number of text + space + possible number (ex. "Mar 15")
# group2 = another number of digits separated by a period(ex. "12.34")
banana = re.compile(r'(.*)\s+(\d+\.\d+)')

# group1 = any number of text + space + possible number (ex. "Mar 15")
cow = re.compile(r'(\d+\.\d+)')

print('\nREGEX EXPRESSIONS! type out the one that applies---')
print('apple = $ first')
print('banana = $ later')
print('cow = $ only')

regexToUse = input('\nwhich regex? ')

expenseRun(regexToUse)

input("\nPress enter to exit;")

 ) By 2020 though, I had picked up the script and developed it further to become an immersive, AR experience that took over two weeks where you interact with the project through navigating websites, answering and writing emails to characters, and more. The project was chosen by Impulse Theatre ‘s Peek Fest Digital Residency , and the mentor they had was, you guessed it, Adrienne! I remember remarking how incredible it was that ten years later I got to work with her again on the art form that she first introduced me to. It felt like a full circle moment.


